The purpose of this lab is to be a reasonable complexity collection of policies that a novice developer can comprehend to be able to demonstrate advanced techniques of proxy authoring.
What to Expect
- Realistic collection of policies working in concert
- Manipulations with KVM, Cache
- Integration with Firestore/Google OpenID Connect
- Firestore batch processing
- Understanding sequence of policies with conditions as Flow Charts
The User Case
The lab assumes an enterprise customer ESB Tibco backend. If an error is caused by incoming request, ESB would return a 'technical' Tibco-specific code. Edge proxy would take this code and convert it into a client-application friendly error code(s), unified across API Platform project.
The Assign Message policy at the beginning of the lab hard-code a test backend error code, and put processing sequence of policies into a proxy endpoint request preflow event. This way we can trigger the execution by using built-in http GET request button of the Tracing facility.
The lab uses Firestore database as a persistent storage. Being a Google product, it uses OIDC for Authentication and Authorisation of access to Firestore API services. In this way, the lab also is an OAuth/OIDC client that exposes students to yet another example of OAuth usage, which helps to build hands-on experience required when discussing OAuth topic.
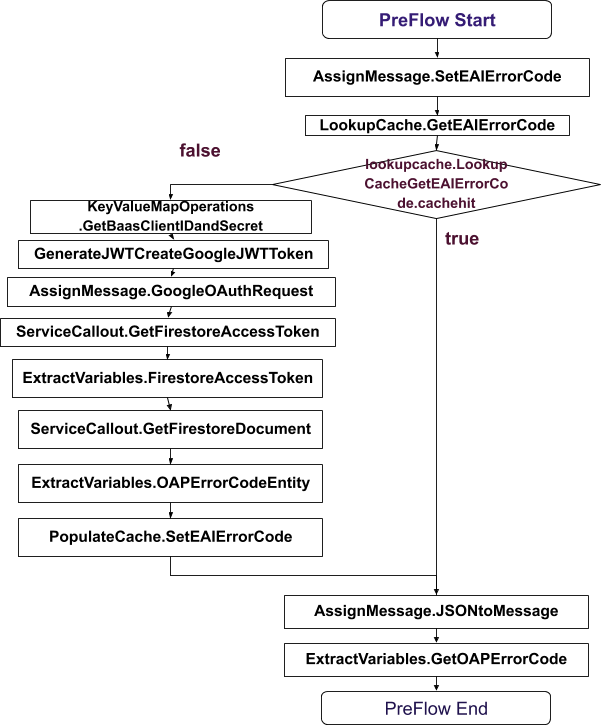
The Lab has a flow chart diagram that illustrates execution flow of the proxy.
Products and URLs
Beware of what URL you are using while executing the lab. Each solution component has UI and API hostnames. They also have their own conventions to represent a hierarchies of object domains. For example, for Edge that would be organization and environment; for Firestore project: database and document respectively.
Product | UI | API Org/Env or Project |
Edge | https://api.enterprise.apigee.com /v1/o/dbcjd/e/test | |
Firestore | https://firestore.googleapis.com /v1beta1/projects/dbclabs/databases/(default)/documents/ | |
GCP IAM | https://accounts.google.com/o/oauth2 /iam-admin/iam/project?project=dbclabs-yl |
Prerequisites
[ ] Apigee Trial org
[ ] Firebase Trial org
[ ] Postman
How will you use this tutorial?
How would you rate your experience with Google Cloud Platform?
0. Login into your Google Account
1. Navigate to https://console.firebase.google.com
2. Chose + Add Project
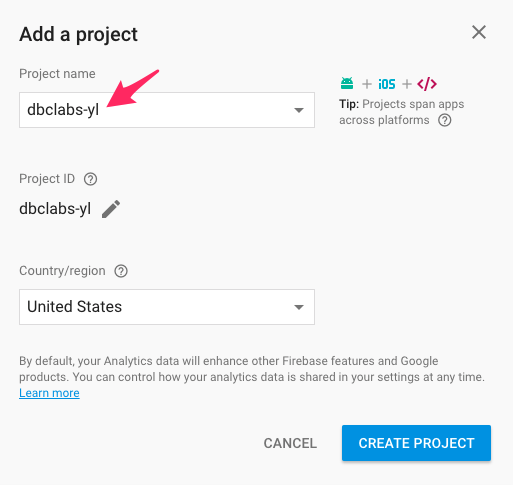
3. Enter a project name and country/region
Project ID: dbclabs-yl
Country/region: United Kingdom
The Firebase goes through the steps of:
- Creating your project
- Provisioning resources
- Finishing up
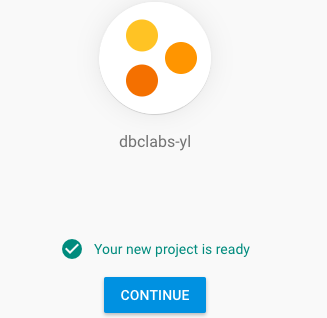
4. When your new project is ready, press Continue
5. In the left-side menu, chose DEVELOP, click on Database item.
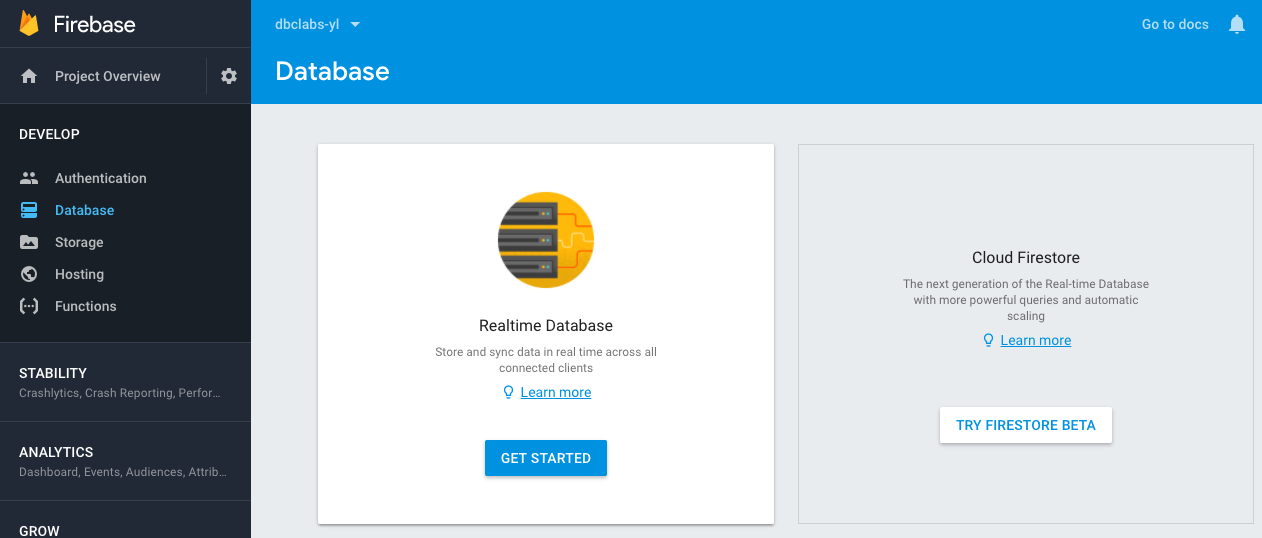
6. You are provided with a choice of Realtime Database or Firestore. Click on TRY FIRESTORE BETA button.
The Security rules for Cloud Firestore dialog will open.
7. Select Start in test mode radio-button. Click on ENABLE.

After the Firestore instance is created, the Database Editor is open.
Defining errorcodesmap Document Collection
1. Click on + ADD COLLECTION link.
2. Enter the errorcodesmap as a new collection name
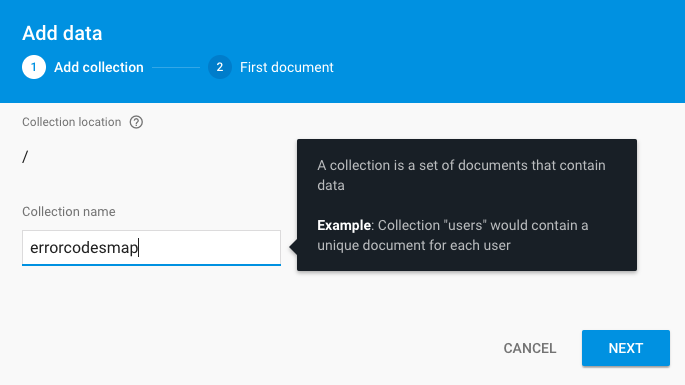
2. Press NEXT button to create first document.
3. Fill the document form. Add new fields by pressing on the + round button
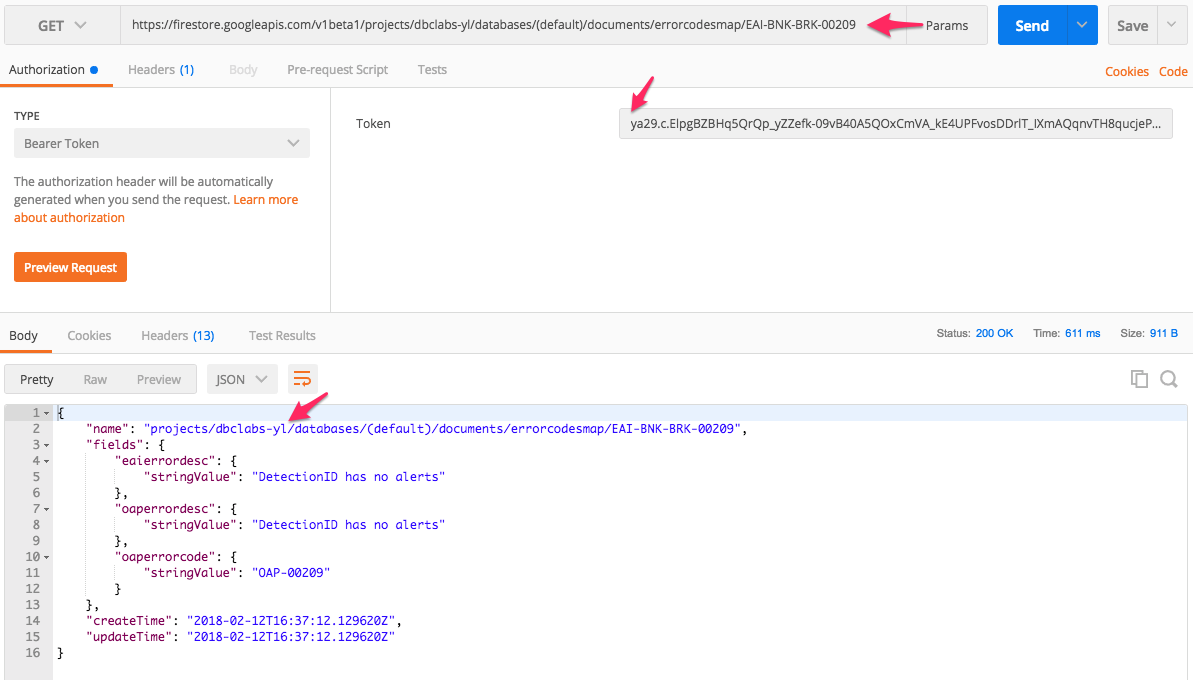
Document id: EAI-BNK-BRK-00209
Field: "eaierrordesc", Type: string, Value: "DetectionID has no alerts"
Field: "oaperrorcode", Type: string, Value: "OAP-00209"
Field: "oaperrordesc", Type: string, Value: "DetectionID has no alerts"
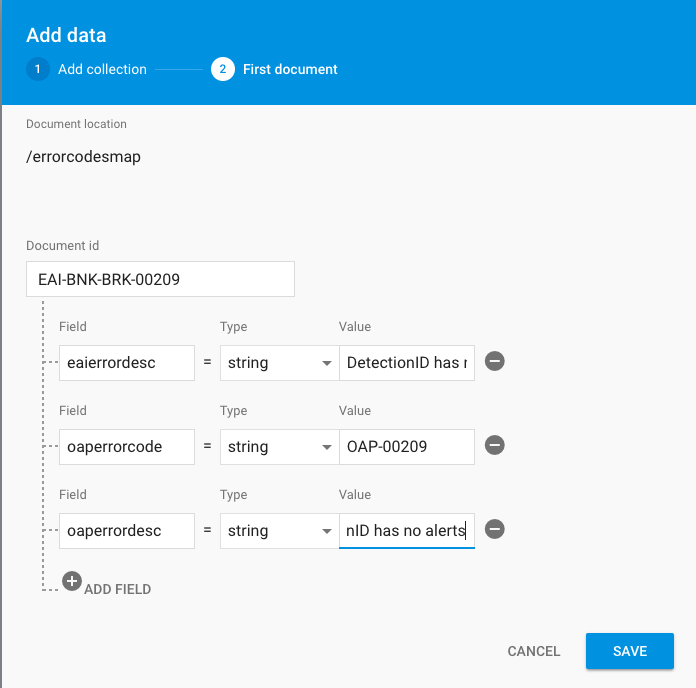
4. Click on the SAVE button.
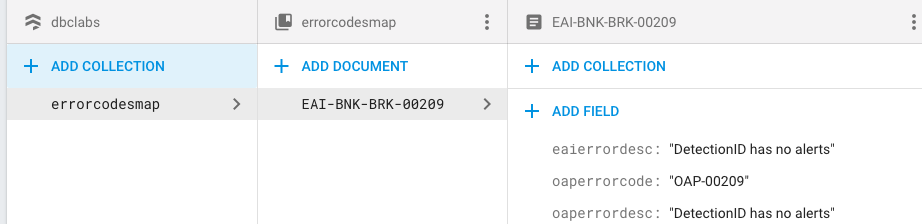
The Document will be saved and displayed.
Google OpenID Connect Service Account
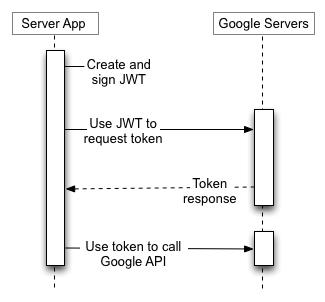
Google implements OAuth 2.0 for authentication, which conforms to the OpenID Connect specification.
To interact with our Firestore instance in a server-to-server mode using REST API, we need to have a service Account that we can use to obtain OAuth 2.0 access_token.
The OAuth 2.0 for Service Accounts Flow we are going to use is documented here:
https://developers.google.com/identity/protocols/OAuth2ServiceAccount
1. Open Users and permissions console by selecting a cog next to the Project Overview left-side menu item. Click on the Users and Permissions menu item.
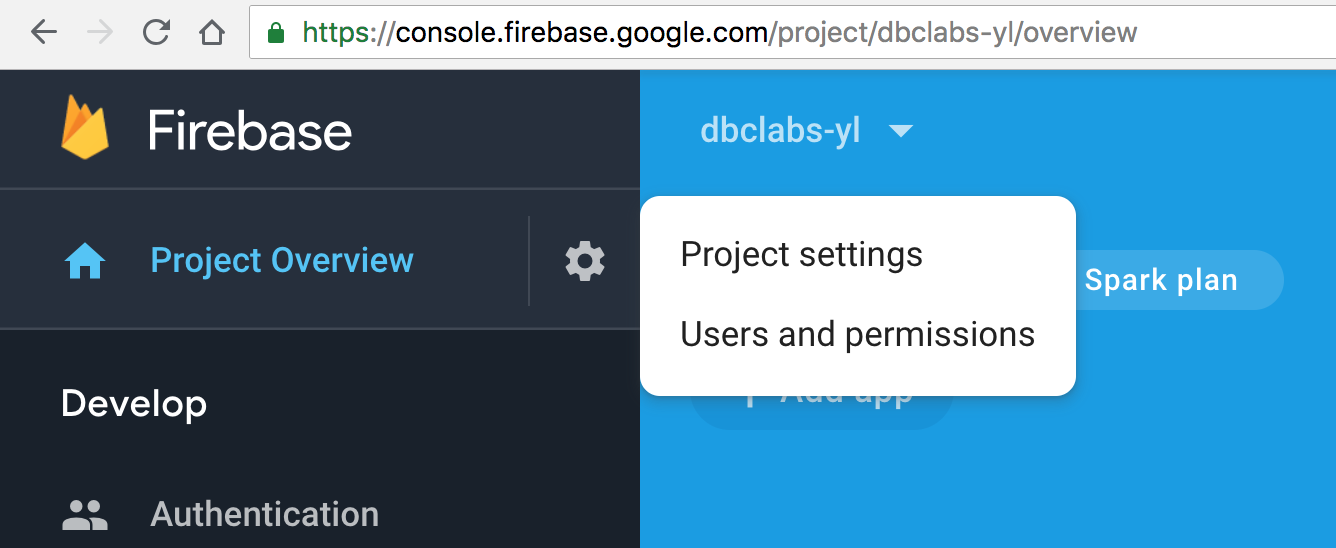
2. When the Settings page opens, click at the Advanced permissions settings external link in the bottom right part of the screen to open the Google IAM page in a separate browser tab.

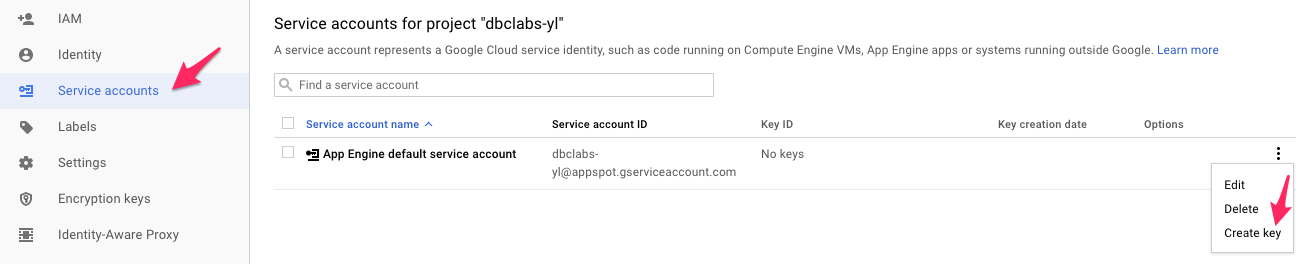
We are redirected now to the Google Cloud console web page for your Firebase project, ie., dbclabs-yl.

Notice the default service account ID, dbclabs-yl@appspot.gserviceaccount.com .
3. Click on the Service accounts left-side menu item. In the maintenance menu of the service account, select Create key item.
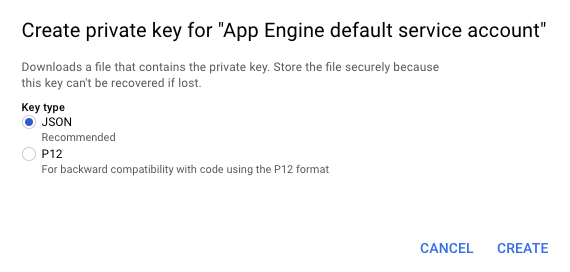
4. Chose JSON key type. Click on CREATE.
5. The private key will be generated and automatically downloaded to your computer.
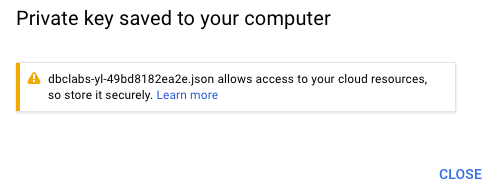
Close the CLOSE button.
We can close the IAM Console tab now.
6. In your working labs folder (ie, ~/dbc), create a folder iam and copy the private key json file there.
Create and Sign JWT Manually
1. Navigate to the https://jwt.io/ page.
A sample JWT token with HS256 Algorithm will open.
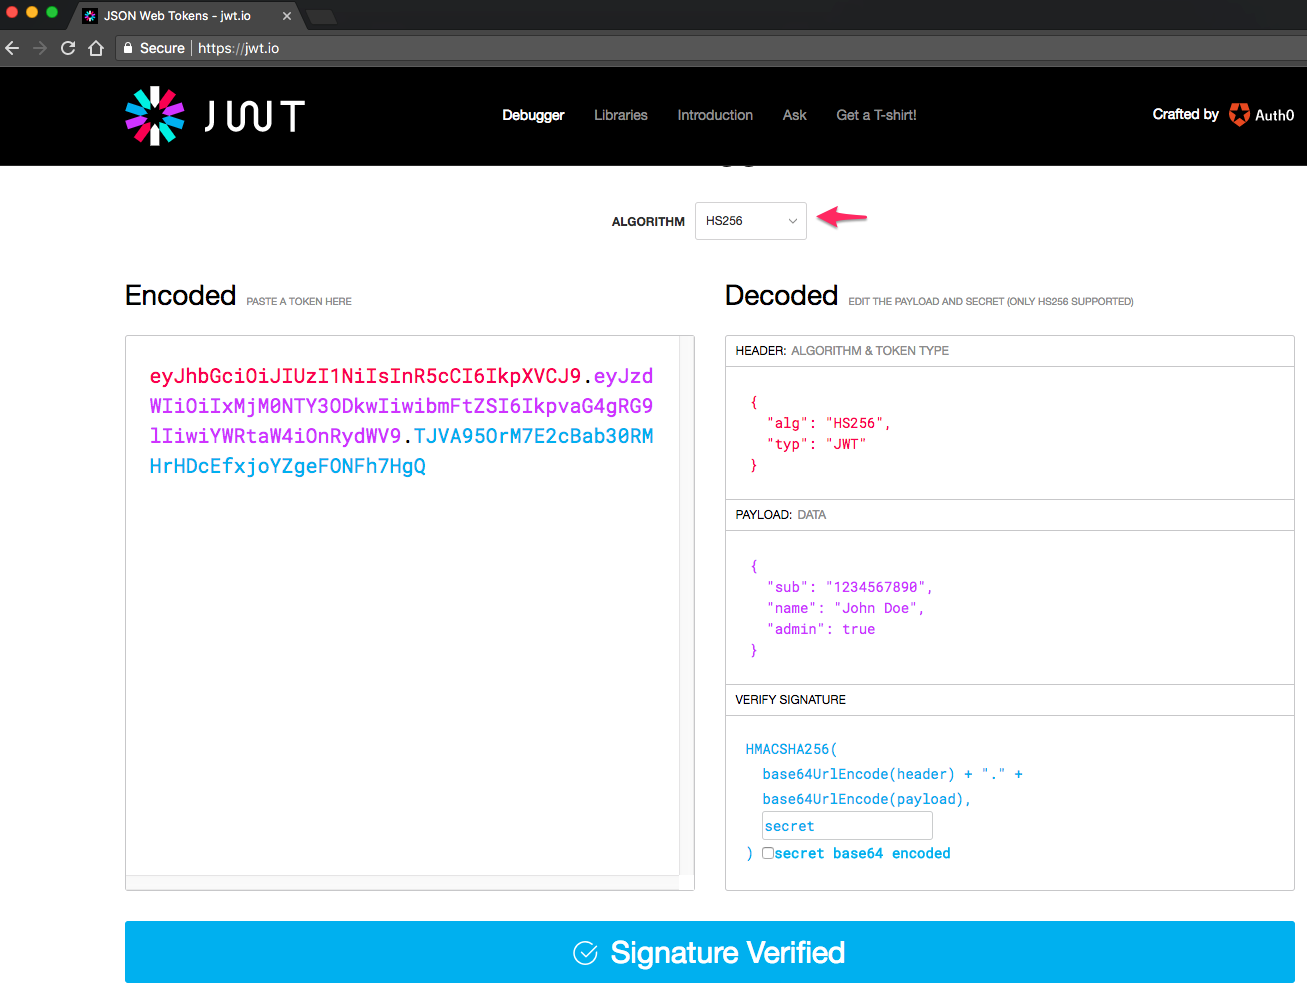
2. Chose RS256 algorithm.
3. Leave default value in the HEADER: ALGORITHM & TOKEN TYPE field:
{
  "alg": "RS256",
  "typ": "JWT"
}
4. Open the JSON key file in your preferred editor. We need some values for private key and public certificate.
$ cat dbclabs-yl-49bd8182ea2e.json

{
  "type": "service_account",
  "project_id": "dbclabs-yl",
  "private_key_id": "49bd8182ea2ecc89e4d90b9b96a3d96394f24dfc",
  "private_key": "-----BEGIN PRIVATE KEY-----\nMIIEvgIBADANBgkqhkiG9w0BAQEFAASCBKgwggSkAgEAAoIBAQCwdWsPrdtCTc
....
X9XgJULADML+7l\nAwf5t/WTtn9NVmKhUnVlikokMniC3UpJ3Sm+pvleZi6+ce5lmMX/tDoAwf54vM0+\n69Ixq1m6e6ImBWtpU1AB4auOtsCLah76nt92s0T7euZ5YH2bxEWF37+/16Q7YTyL\ncEn6HqVjwHa6ixIuoMh3FNfm\n-----END PRIVATE KEY-----\n",
  "client_email": "dbclabs-yl@appspot.gserviceaccount.com",
  "client_id": "111243874671647848429",
  "auth_uri": "https://accounts.google.com/o/oauth2/auth",
  "token_uri": "https://accounts.google.com/o/oauth2/token",
  "auth_provider_x509_cert_url": "https://www.googleapis.com/oauth2/v1/certs",
  "client_x509_cert_url": "https://www.googleapis.com/robot/v1/metadata/x509/dbclabs-yl%40appspot.gserviceaccount.com"
}
5. Prepare epoch Timestamp values. Open https://www.epochconverter.com/ site.
Change Hr field to the next hour.
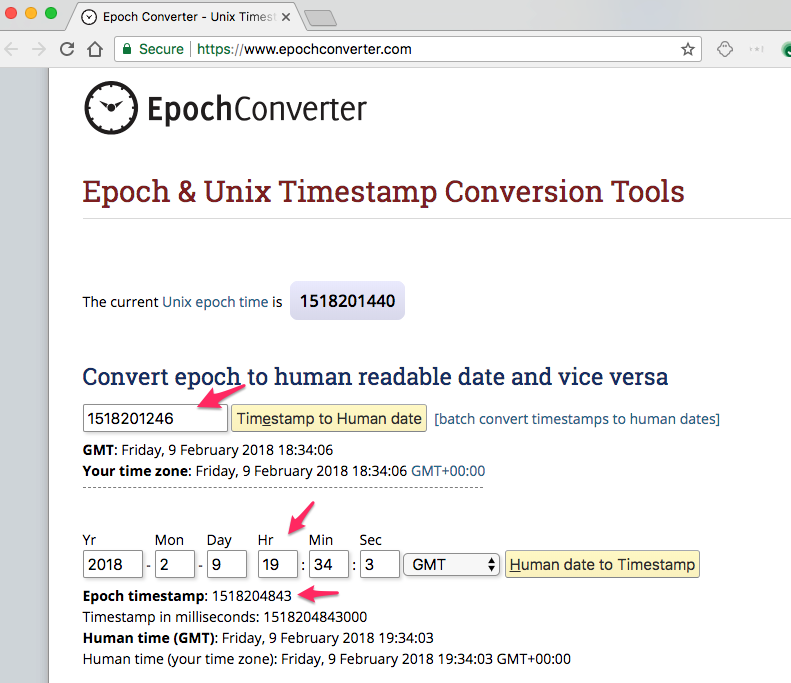
Make a note of the current Unix epoch time and the one-hour-ahead epoch time.
6. Populate PAYLOAD: DATA field
You need to edit some values accordingly:
Issue: iss, <your-service-account-id>
Scope: scope, for your Firestore database instance access
Audience: aud, googleapis token endpoint
Token Expiration time: exp, the one-hour-ahead epoch value from the previous step
Issued At: iat, current Unix epoch time from the previous step.
{
  "iss": "dbclabs-yl@appspot.gserviceaccount.com",
  "scope": "https://www.googleapis.com/auth/datastore",
  "aud": "https://www.googleapis.com/oauth2/v4/token",
  "exp": 1518204843,
  "iat": 1518201246
}
7. Paste the private_key from your json file into the Private Key (RSA) field of the jwt.io form.
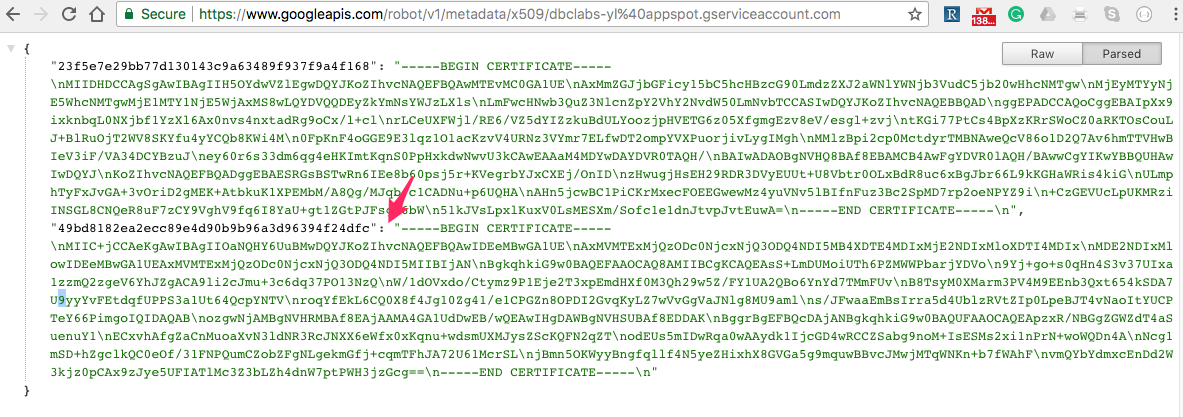
8. Use client_x509_cert_url field value from the .json document with your private key to open URL with your project public certificates, i.e.:
https://www.googleapis.com/robot/v1/metadata/x509/dbclabs-yl%40appspot.gserviceaccount.com
9. Use private_key_id value to identify correct public certificate.
10. Paste the Public Certificate from the previous step into the jwt.io Public Key or Certificate field.
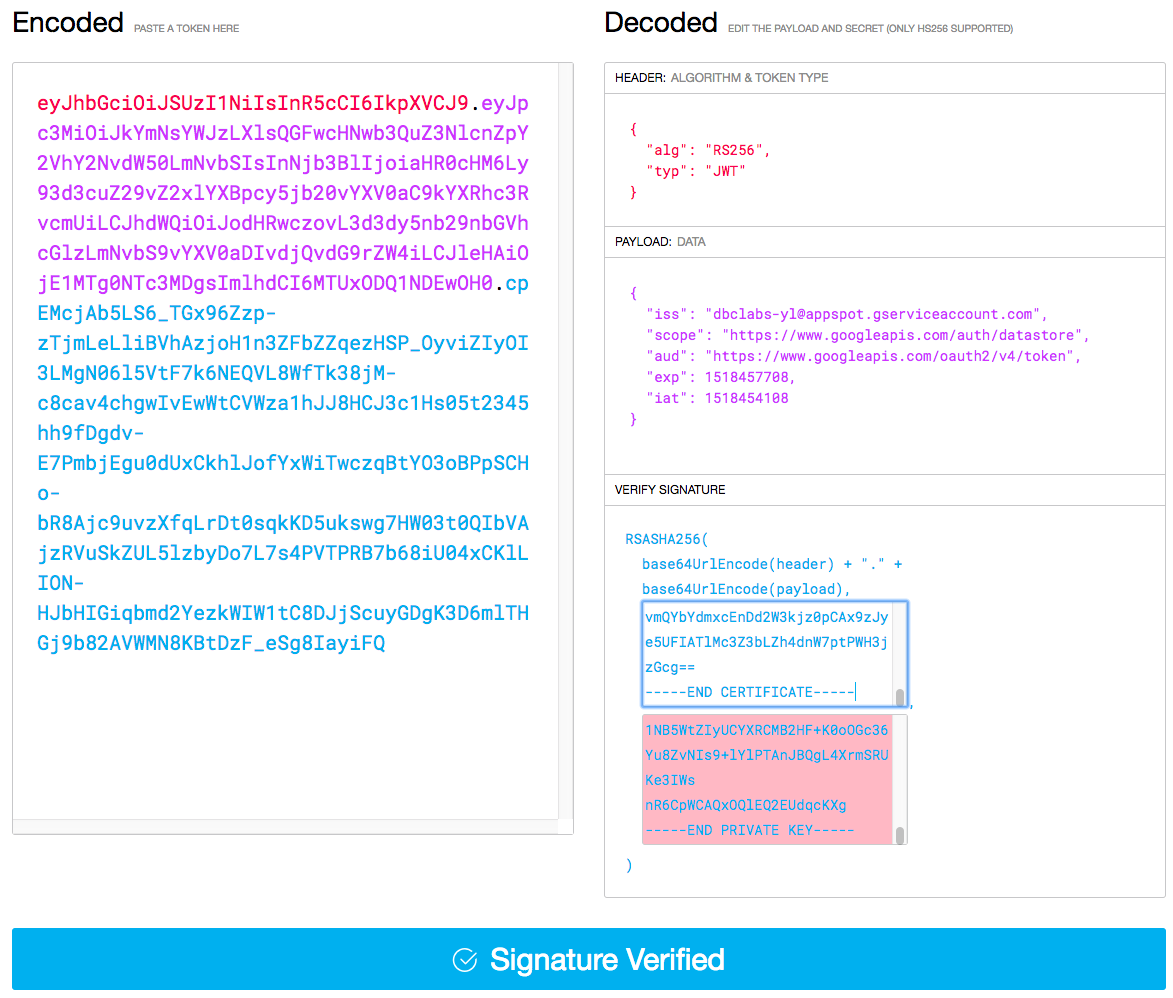
Observer the Signature Verified blue validation result.
11. Make a note of the JWT token from the Encoded field.
eyJhbGciOiJSUzI1NiIsInR5cCI6IkpXVCJ9.eyJpc3MiOiJkYmNsYWJzQGFwcHNwb3QuZ3NlcnZpY2VhY2NvdW50LmNvbSIsInNjb3BlIjoiaHR0cHM6Ly93d3cuZ29vZ2xlYXBpcy5jb20vYXV0aC9kYXRhc3RvcmUiLCJhdWQiOiJodHRwczovL3d3dy5nb29nbGVhcGlzLmNvbS9vYXV0aDIvdjQvdG9rZW4iLCJleHAiOjE1MTgyMDQ4NDMsImlhdCI6MTUxODIwMTI0Nn0.cRxRBvKVPZSPBHpO6MtiDeO8LILqcWq8k1mYfBTg4yO7sBqC8DyzU6SfuU9g3Q-ZMA6cbxsWWPVJ_qOd_HTWBGI0QKkJ8Fcm7dXuTHrCKW0tRmuNUKPqqNnTAR8Fw0VJSHcnCmFf1ONlg1PQ7tNfmsFp0aTAb794kesk4CCP3SsT3VI2FsZixFVGUfpu6fccpTrofe6xAj4MdWUrCkEtmLD03CA6tn0Bk3yvU_r7qgWL42EpfMj8IKUWDGpOFjUBlrRzC59MGeGQrc8KIrDExOPiQPpmG-FSWKjjgGv1naKGDC00yO9pb-28piUKBIYj0FMIJJ2utBpTMirsispN6wUse JWT to Obtain Access Token
1. Create a new POST request in Postman
2. Use https://www.googleapis.com/oauth2/v4/token endpoint
3. In the request Body tab, select x-www-form-urlencoded radio-button.
4. In the form fields, create grant_type Key with urn:ietf:params:oauth:grant-type:jwt-bearer value
5. In the form fields, create assertion Key with your JWT token as a value.
6. Send the request.
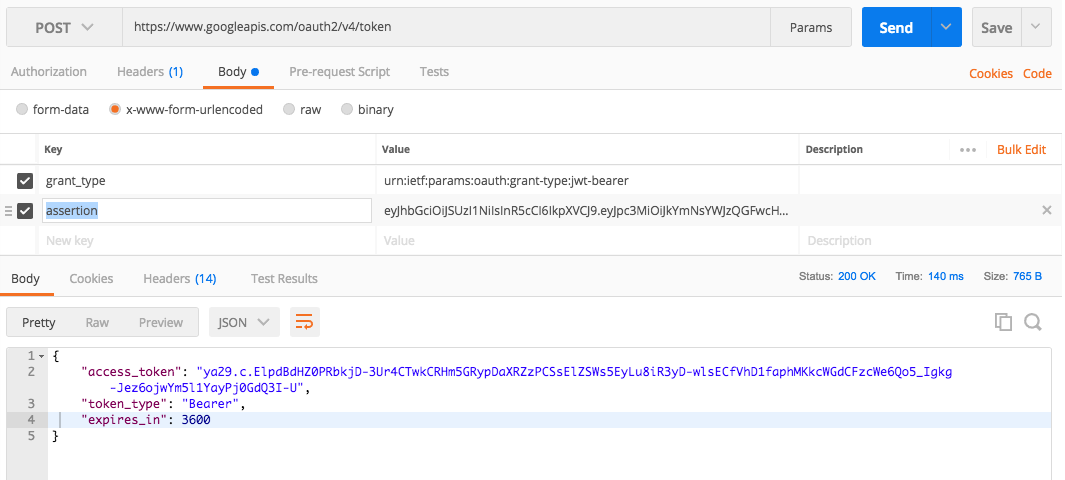
The access_token value will be returned amongst other fields.
{
    access_token": "ya29.c.ElpdBdHZ0PRbkjD-3Ur4CTwkCRHm5GRypDaXRZzPCSsElZSWs5EyLu8iR3yD-wlsECfVhD1faphMKkcWGdCFzcWe6Qo5_Igkg-Jez6ojwYm5l1YayPj0GdQ3I-U",
    "token_type": "Bearer",
    "expires_in": 3600
}
Fetching Single Document Using Firestore REST API
1. In Postman prepare GET request to the document URL:
2. Select Authorization tab of the request and chose Bearer Token type. Enter the access_token obtained from Google Authorization server into the token field.
3. Execute request, click on the Send button.
Batched Write to the Collection to Create Multiple Documents
1. In the Postmen, create a new POST request to the
https://firestore.googleapis.com/v1beta1/projects/dbclabs-yl/databases/(default)/documents:commit
endpoint.
2. In the Authorization tab of the request, choose Type Bearer and enter a valid access_token

3. In the Body tab of the request, select row radio-button and chose JSON (application/json) type combo-box value

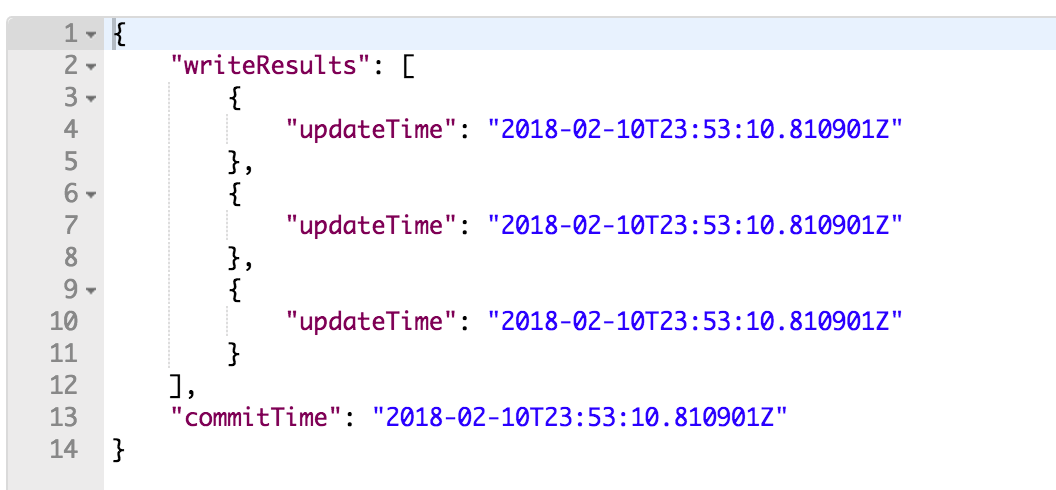
4. Populate the body of the request with the batch of the update writes to insert three new documents.
{
    "writes": [
        {
            "update": {
                "name": "projects/dbclabs-yl/databases/(default)/documents/errorcodesmap/EAI-BNK-BRK-00210",
                "fields": {
                    "oaperrordesc": {
                        "stringValue": "DetectionID has no alerts"
                    },
                    "oaperrorcode": {
                        "stringValue": "OAP-00210"
                    },
                    "eaierrordesc": {
                        "stringValue": "DetectionID has no alerts"
                    }
                }
            }
        },
        {
            "update": {
                "name": "projects/dbclabs-yl/databases/(default)/documents/errorcodesmap/EAI-BNK-BRK-00211",
                "fields": {
                    "oaperrordesc": {
                        "stringValue": "DetectionID has no alerts"
                    },
                    "oaperrorcode": {
                        "stringValue": "OAP-00211"
                    },
                    "eaierrordesc": {
                        "stringValue": "DetectionID has no alerts"
                    }
                }
            }
        },
        {
            "update": {
                "name": "projects/dbclabs-yl/databases/(default)/documents/errorcodesmap/EAI-BNK-BRK-00212",
                "fields": {
                    "oaperrordesc": {
                        "stringValue": "DetectionID has no alerts"
                    },
                    "oaperrorcode": {
                        "stringValue": "OAP-00212"
                    },
                    "eaierrordesc": {
                        "stringValue": "DetectionID has no alerts"
                    }
                }
            }
        }
    ]
}
5. Press Send to execute request.
You will get a list of write results timestamps as well as a commit time.
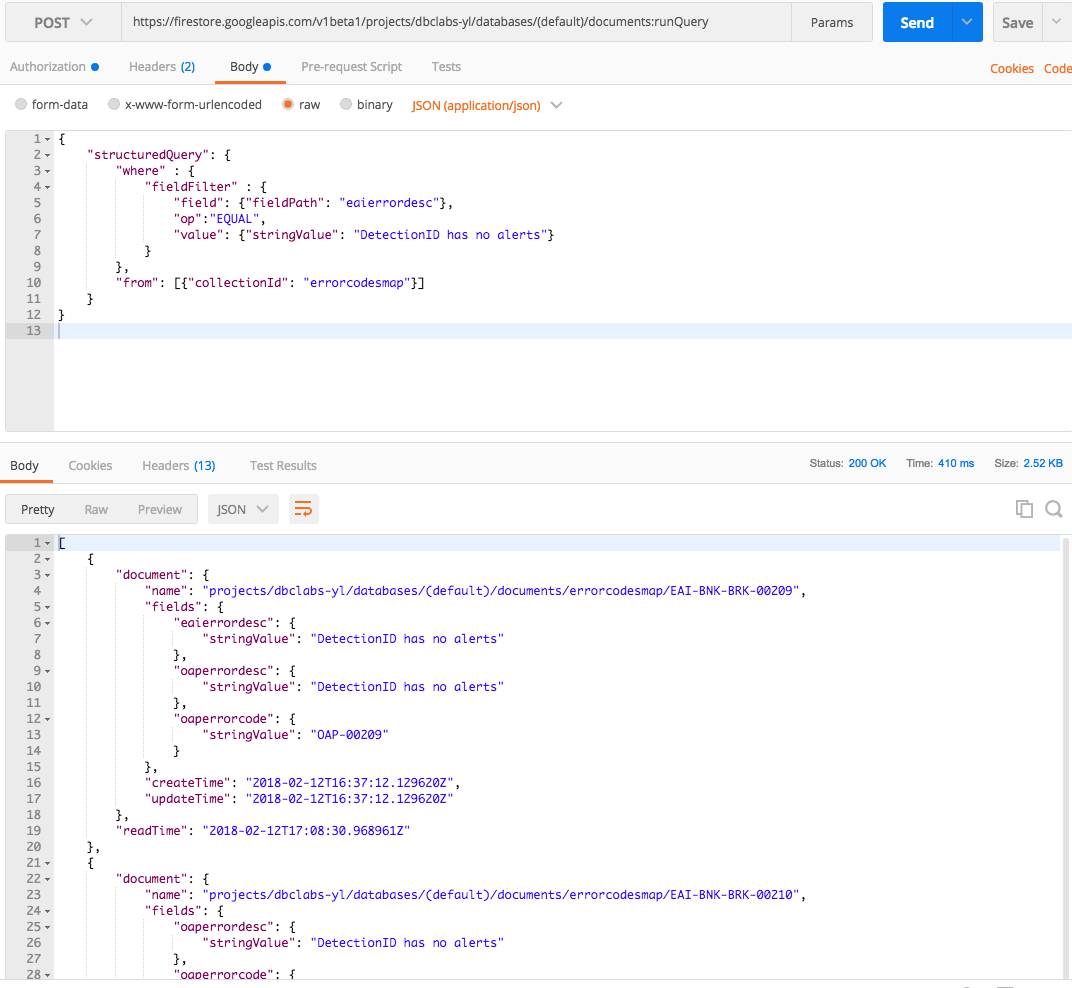
Firestore Query Request
Let's create a structured query that fetches all documents whose eaierrordesc field is equal to the "DetectionID has no alerts" field value.
As we currently have 4 records with this duplicate value, we expect 4 documents to be returned.
1. In the Postman, send a POST request to the :runQuery endpoint
https://firestore.googleapis.com/v1beta1/projects/dbclabs-yl/databases/(default)/documents:runQuery
2. Define Bearer token with active access_token value.
3. Define body of application/json type with content of the structuredQuery object.
{
    "structuredQuery": {
        "where" : {
            "fieldFilter" : {
                "field": {"fieldPath": "eaierrordesc"},
                "op":"EQUAL",
                "value": {"stringValue": "DetectionID has no alerts"}
            }
        },
        "from": [{"collectionId": "errorcodesmap"}]
    }
}
4. Execute the request to fetch the list of selected documents.
Now let's create an Edge proxy that takes a Target system error code and converts it into our company's API Platform error code. To make the proxy more responsive, we will be storing the fetched instance of the errorcodemaps collection in the cache on retrieval.
Also, let's put our Firestore credentials into the KVM as well, so we can change them without changing and re-deploying the code.
While performing ServiceCallout calls to the Firestore, we want to configure a Target Server object with specific hostname and port values of the Firestore instance.
Create No Target proxy
As we are processing an error code returned by the backend, eventually, the collection of policies we are creating will be located in a response flow. To improve our edit-deploy-trace loop, we are going to define our policies in the PreFlow event of the Proxy Endpoint and the first policy will hard-code a test value, so that we can just press the Send button of the Tracing facility to execute the proxy.
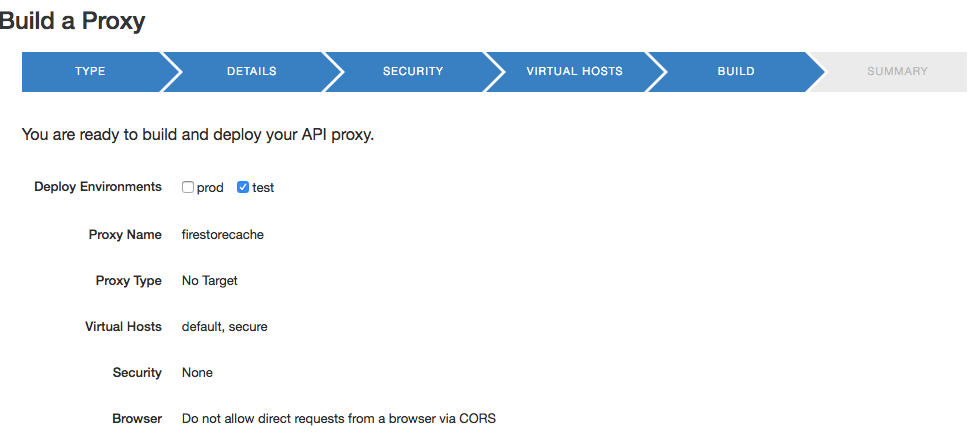
1. In the Edge UI, API Proxies page, click + API Proxy button.
2. On the Build a Proxy TYPE page of the Add API Proxy wizard select No Target radio button. Press Next.
2. Fill the proxy properties form of the DETAILS wizard page
Proxy Name: firestorecache
The Proxy Base Path will be auto populated. Next.
3. On a SECURITY page, choose Authorization Pass through (none) radio button. Next.
4. On VIRTUAL HOSTS wizard page, leave default and secure check boxes checked. Next.
5. On the BUILD wizard page confirm that test checkbox is selected. Click on the Build and Deploy button.
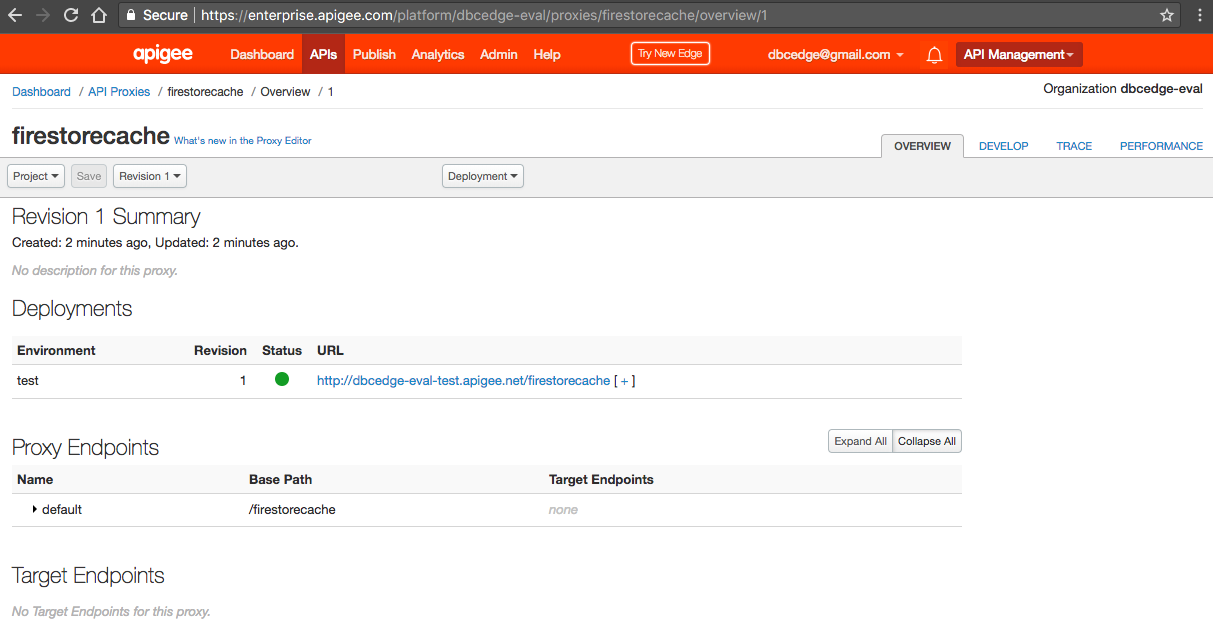
6. The proxy is a) Generated; b) Uploaded and c) Deployed. Click on the firestorecache link to open the proxy editor.
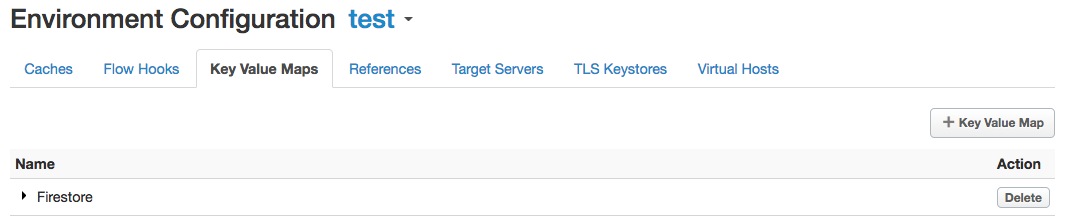
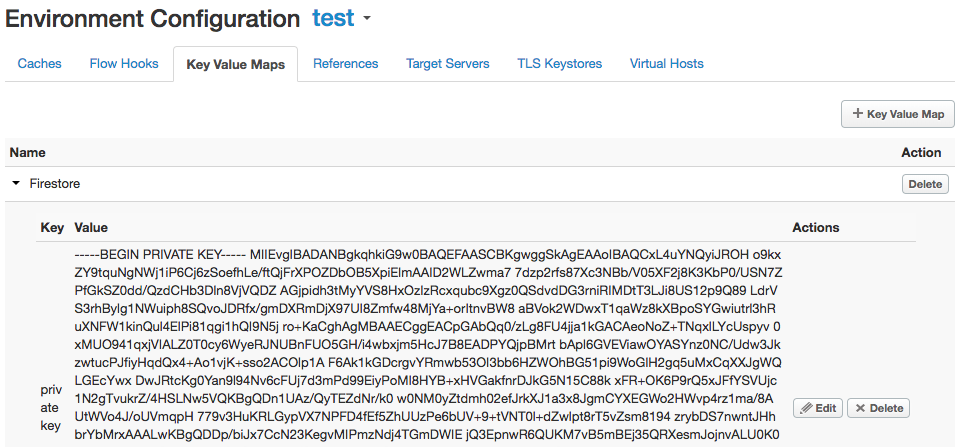
1. From the main menu, select APIs/Environment Configuration item.
2. By default the prod environment is active. Select test environment from the environment combobox.
3. Choose Key Value Maps tab.
4. Click on the + Key Value Map button. Enter Firestore as a name of a new KVM. Press Add.
Setting up Multiline value of KVM Entry
1. In the Postman, configure a new GET request to the Management API URL, pointing to the Firestore KVM of your org and test environment.
https://api.enterprise.apigee.com/v1/o/dbcedge-eval/e/test/keyvaluemaps/Firestore
2. In the Authorization tab of the request, enter your Username email and Password of your org for the Basic Auth type.
3. Execute request. There are no entries defined yet.

4. Convert the request to POST.
5. Edit the URL by appending /entries
6. Add or make sure that the Headers Content-Type value is set to application/json

7. Set the Body of the request to the value of your private key, copied-and-pasted from your .json file with \n end-of-line escape characters.
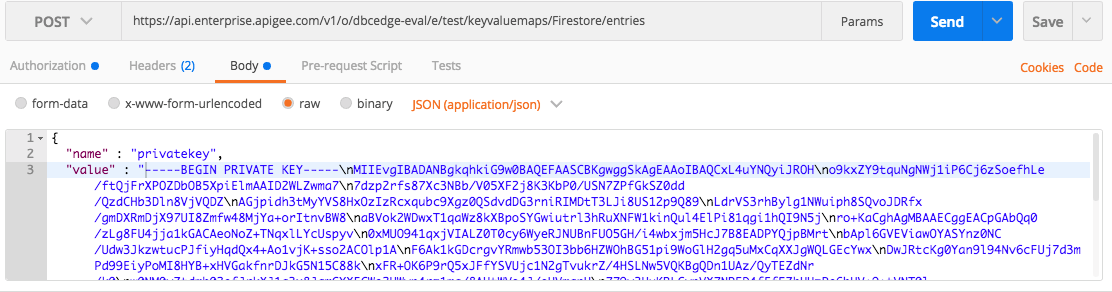
8. Execute the request. The response body will be populated with the multi-line value.
9. Check that the value is present by refreshing test's Environment Configuration and opening Firestore entry in the Key Value Maps tab.
Configure Target Server Definition
1. Make sure that you are working against test environment.
2. Select Target Servers tab.
3. Press the Edit button.
4. Press the + Target Server button.
5. Populate configuration for the new server
Name: Firestore
Host: firestore.googleapis.com
Port: 443
Enables: checked
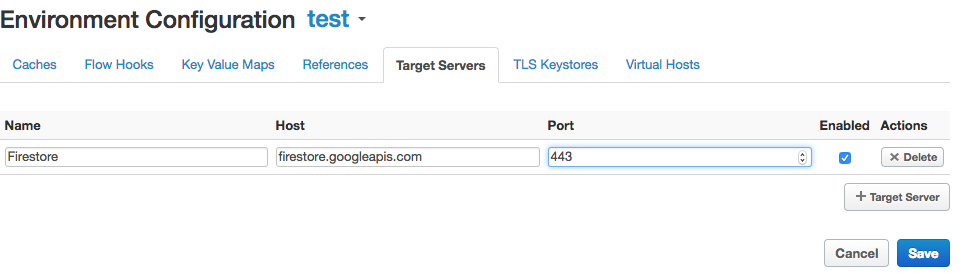
6. Press the Save button.
As we are going to use https connection, we need to switch on SSLInfo Enabled flag for our target server.
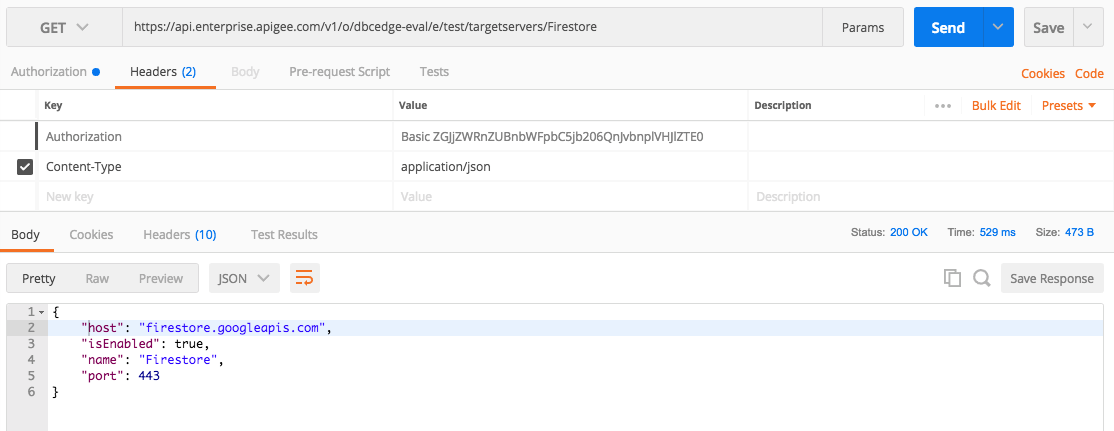
7. Open the Postman and execute GET request to the API management to fetch current definition of the Firestore target server
Method: GET
URL: https://api.enterprise.apigee.com/v1/o/dbcedge-eval/e/test/targetservers/Firestore
Authorization Type: Basic Auth
Username: <email>
Password: <password>
Press the Send button to execute the query.
8. To change target server configuration, change request's Method to POST.
9. Copy the body of the GET response, click on the Body of the request, and paste it into the request body field. Make sure that the Postman request Body type is set to raw.
10. Change the type of the body to application/json.
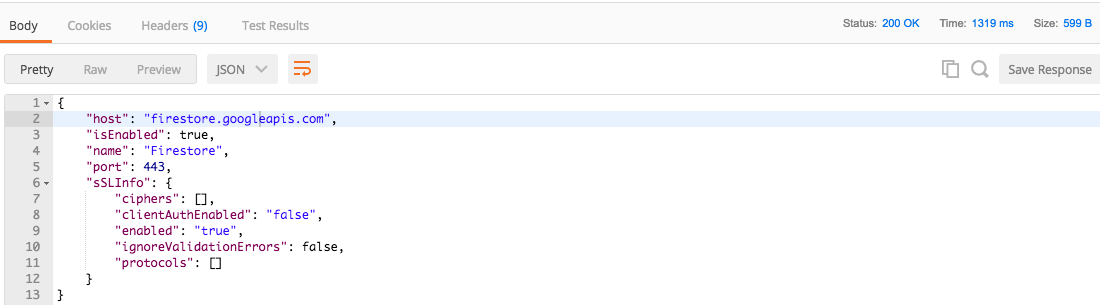
11. Edit the body by appending the "port": 443 line by:
,
        "sSLInfo": {
            "enabled": true
        }
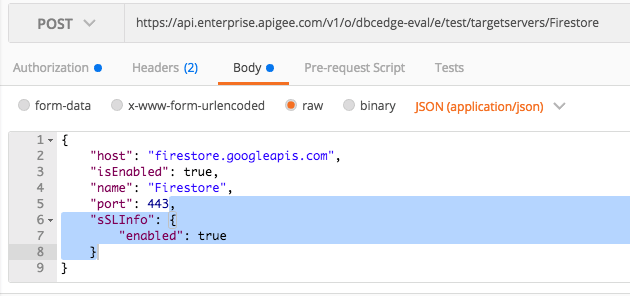
12. Execute request by pressing Cmd+Enter. Successful response should look like:
1. Switch to APIs/API Proxis. Open firestorecache proxy in DEVELOP tab.
2. In the Flow: PreFlow diagrammer, click on the + Step button on the right above REQUEST arrow.
Fetch Firestore Private Key from the Firestore KVM
1. Select MEDIATION/Key Value Map Operations Policy.
2. Enter KeyValueMapOperations.GetFirestorePrivateKey as a Display Name and Name properties. Click Add.
3. Edit default XML template as follows:
<KeyValueMapOperations async="false" continueOnError="false" enabled="true" name="KeyValueMapOperations.GetFirestorePrivateKey" mapIdentifier="Firestore">
    <DisplayName>KeyValueMapOperations.GetFirestorePrivateKey</DisplayName>
    <Get assignTo="private.privatekey">
        <Key>
            <Parameter>privatekey</Parameter>
        </Key>
    </Get>
    <Scope>environment</Scope>
</KeyValueMapOperations>
4. Press Save. Agree to create a New Proxy Revision.
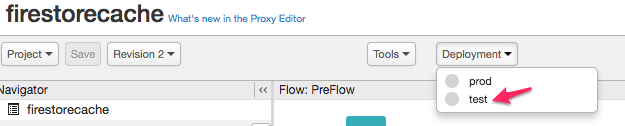
5. As the new proxy revision was created, it is not deployed automatically. Click on Deployment combobox and press on the test item. Confirm by clicking on Deploy button.
Generate JWT Policy
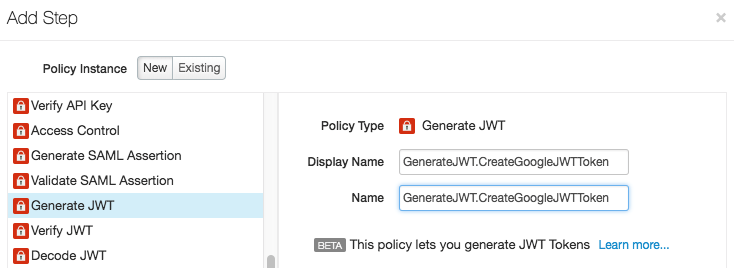
1. In the Flow: PreFlow diagrammer of the DEVELOP tab, click on the + Step button on the right above REQUEST arrow.
2. In the SECURITY section, select the Generate JWT policy.
3. Enter GenerateJWT.CreateGoogleJWTToken as Display Name and Name fields values.
4. Replace the body of the policy with the following definition.
<?xml version="1.0" encoding="UTF-8" standalone="yes"?>
<GenerateJWT async="false" continueOnError="false" enabled="true" name="GenerateJWTCreateGoogleJWTToken">
    <Algorithm>RS256</Algorithm>
    <IgnoreUnresolvedVariables>false</IgnoreUnresolvedVariables>
    <PrivateKey>
        <Value ref="private.privatekey"/>
    </PrivateKey>
    <Issuer>dbclabs-yl@appspot.gserviceaccount.com</Issuer>
    <Audience>https://www.googleapis.com/oauth2/v4/token</Audience>
    <ExpiresIn>60m</ExpiresIn>
    <Id/>
    <AdditionalClaims>
        <Claim name="scope">https://www.googleapis.com/auth/datastore</Claim>
    </AdditionalClaims>
    <OutputVariable>flow.googleoauth.jwt</OutputVariable>
</GenerateJWT>
5. Save the proxy.
Test the JWT Token
1. Switch to the TRACE tab. Press Start Trace Session button.
2. Click the Send button of the deployed GET request.

4. Uncheck Automatically Compare Selected Phase checkbox, so we can see variables of the selected policy.
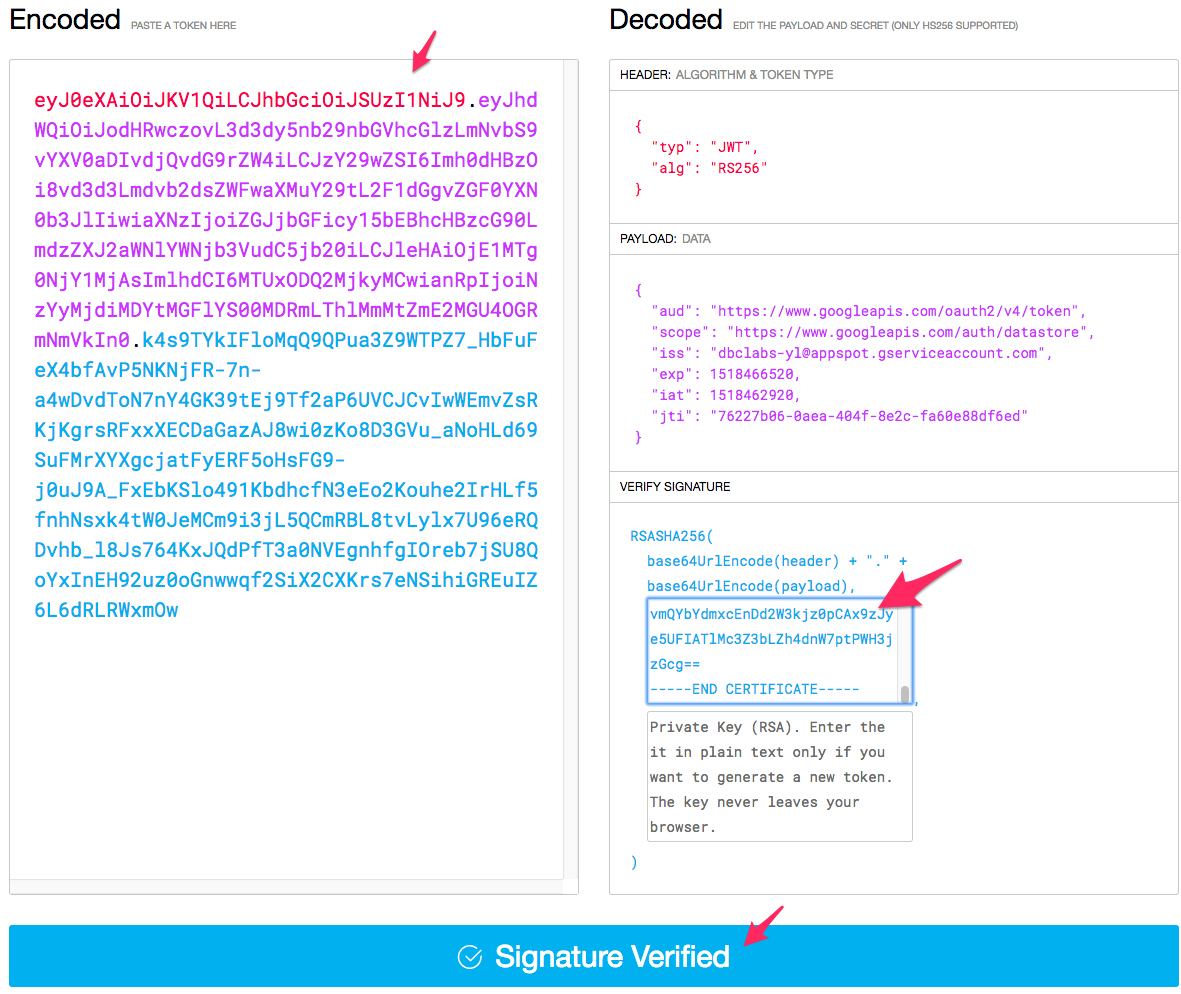
5. Open a jwt.io website and copy the contents of the flow.firestore.jwt variable into the Encoded field.
6. Copy your Public Key into the Public Key or Certificate text field.
7. Observe the Signature Verified message.
Populate Request Message to the Google OAuth Server
1. In the DEVELOP tab select MEDIATION/Assign Message Policy.
2. Enter AssignMessage.GoogleOAuthRequest as a Display Name and Name properties. Click Add.
3. Edit default XML template as follows:
<?xml version="1.0" encoding="UTF-8" standalone="yes"?>
<AssignMessage async="false" continueOnError="false" enabled="true" name="AssignMessage.GoogleOAuthRequest">
    <DisplayName>AssignMessage.GoogleOAuthRequest</DisplayName>
    <AssignTo createNew="true" transport="https" type="request">flow.googleoauth.request</AssignTo>
    <Set>
        <FormParams>
            <FormParam name="grant_type">urn:ietf:params:oauth:grant-type:jwt-bearer</FormParam>
            <FormParam name="assertion">{flow.googleoauth.jwt}</FormParam>
        </FormParams>
    </Set>
    <IgnoreUnresolvedVariables>true</IgnoreUnresolvedVariables>
</AssignMessage>
4. Trace the proxy defined so far. Check the context variables.
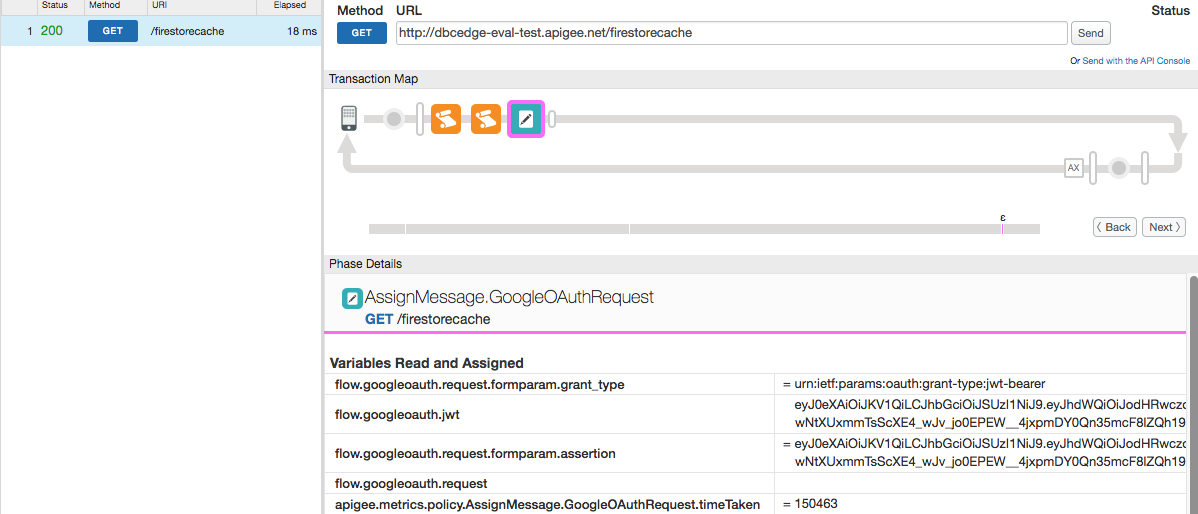
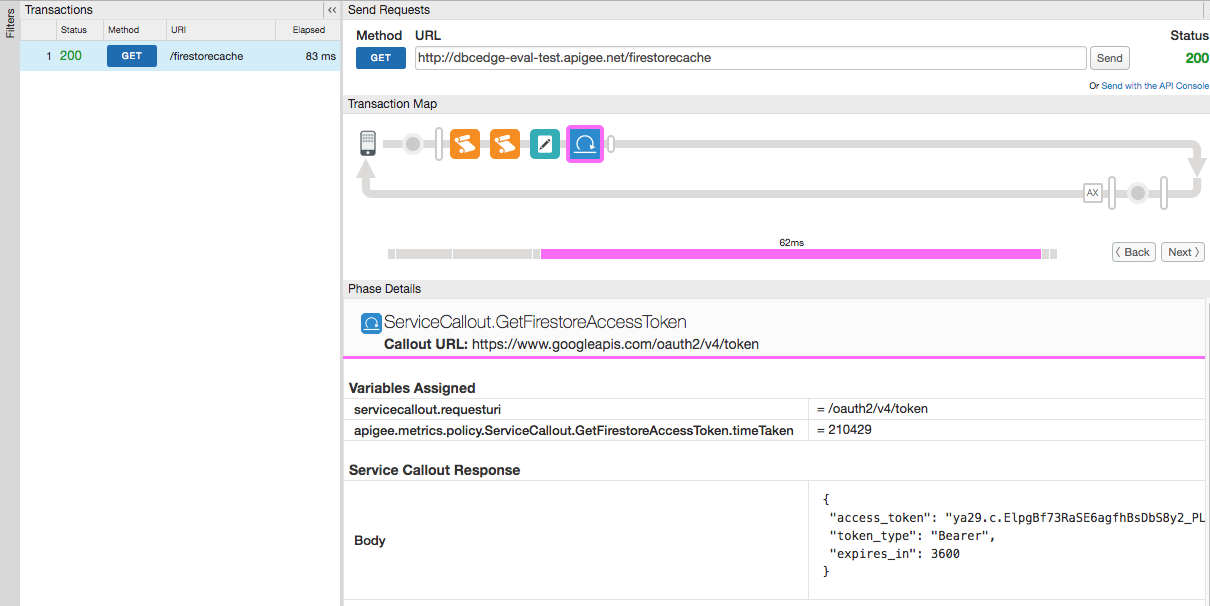
Call Google OAuth Server to Retrieve the Access Token
1. Add EXTENSION/Service Callout policy with ServiceCallout.GetFirestoreAccessToken Display Name and Name. Click Add.
2. Edit the policy to look like:
<?xml version="1.0" encoding="UTF-8" standalone="yes"?>
<ServiceCallout async="false" continueOnError="false" enabled="true" name="ServiceCallout.GetFirestoreAccessToken">
    <DisplayName>ServiceCallout.GetFirestoreAccessToken</DisplayName>
    <Properties/>
    <Request clearPayload="true" variable="flow.googleoauth.request">
        <IgnoreUnresolvedVariables>false</IgnoreUnresolvedVariables>
    </Request>
    <Response>flow.googleoauth.response</Response>
    <HTTPTargetConnection>
        <Properties/>
        <URL>https://www.googleapis.com/oauth2/v4/token</URL>
    </HTTPTargetConnection>
</ServiceCallout>
3. Trace the proxy and observe the access_token in response json.
1. Add MEDIATION/Extract Variables policy with names: ExtractVariables.FirestoreAccessToken. Add.
2. Define Extract Variables policy with the JSONPath expression to extract the access_token
<ExtractVariables async="false" continueOnError="false" enabled="true" name="ExtractVariablesFirestoreAccessToken">
    <DisplayName>ExtractVariables.FirestoreAccessToken</DisplayName>
    <Source>flow.googleoauth.response</Source>
    <JSONPayload>
        <Variable name="flow.firestore.access_token" type="string">
            <JSONPath>$.access_token</JSONPath>
        </Variable>
    </JSONPayload>
</ExtractVariables>
3. Trace the policy and check the variable on context.
Observe and analyse.
* Select Key Value Map Operations policy button.
The variable private.privatekey is correctly populated from the Firestore KVM.
* Service Callout policy trace reflects ServiceCallout.request and ServiceCallout.response variables values.

* ExtractVariables policy shows flow.firestore.access_token as a result of the JSON path expression execution.

Initialize test value for a backend error code
Let's populate a target error code variable value we will be looking for first.
2. Add MEDIATION/Assign Message policy with names AssignMessage.SetEAIErrorCode and XML body:
<?xml version="1.0" encoding="UTF-8" standalone="yes"?>
<AssignMessage async="false" continueOnError="false" enabled="true" name="AssignMessage.SetEAIErrorCode">
    <AssignVariable>
        <Name>flow.target.eaierrorcode</Name>
        <Value>EAI-BNK-BRK-00209</Value>
    </AssignVariable>
    <DisplayName>AssignMessage.SetEAIErrorCode</DisplayName>
</AssignMessage>
3. As we created the policy last, it will be at the end of the sequence. Drag-and-drop it to the front.
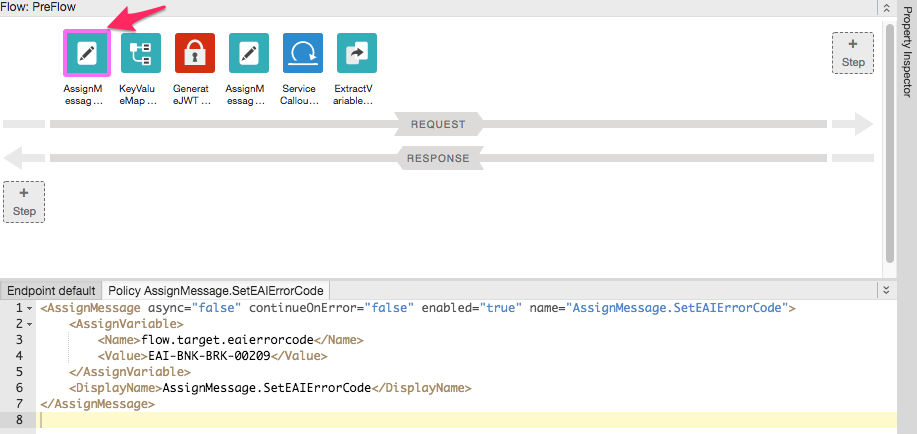
4. Save and Trace the proxy. The flow.target.eaierrorcode values should be correctly populated.

Service Callout to Execute Document Fetch Request
1. Switch to the DEVELOP tab
2. Add EXTENSION/Service Callout policy with ServiceCallout.GetFirestoreDocument name. and XML definition:
<ServiceCallout async="false" continueOnError="false" enabled="true" name="ServiceCalloutGetFirestoreDocument">
    <DisplayName>ServiceCallout.GetFirestoreDocument</DisplayName>
    Request clearPayload="true">
        <Set>
            <Headers>
                <Header name="Authorization"> Bearer {flow.firestore.access_token}</Header>
            </Headers>
        </Set>
    </Request>
    <Response>flow.firestore.response</Response>
    <HTTPTargetConnection>
        <LoadBalancer>
            <Server name="Firestore"/>
        </LoadBalancer>
        Path>/v1beta1/projects/dbclabs-yl/databases/(default)/documents/errorcodesmap/{flow.target.eaierrorcode}</Path>
    </HTTPTargetConnection>
</ServiceCallout>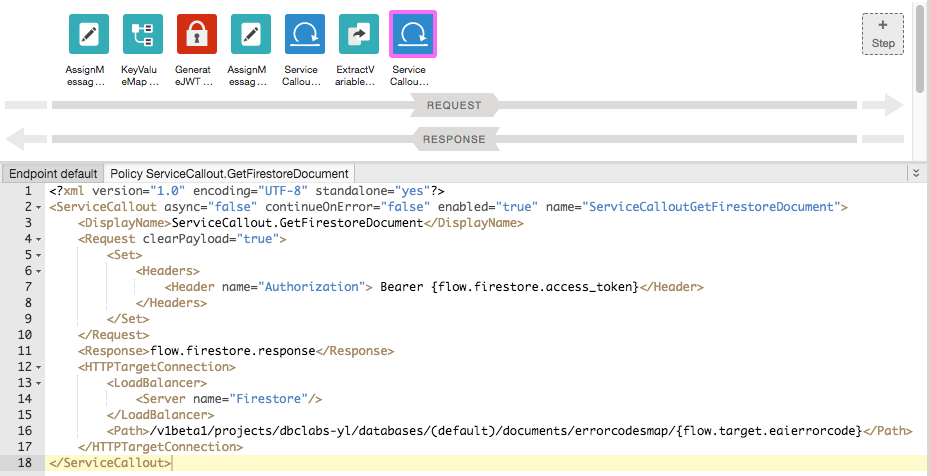
3. Save and Trace the proxy.
Check the response body value
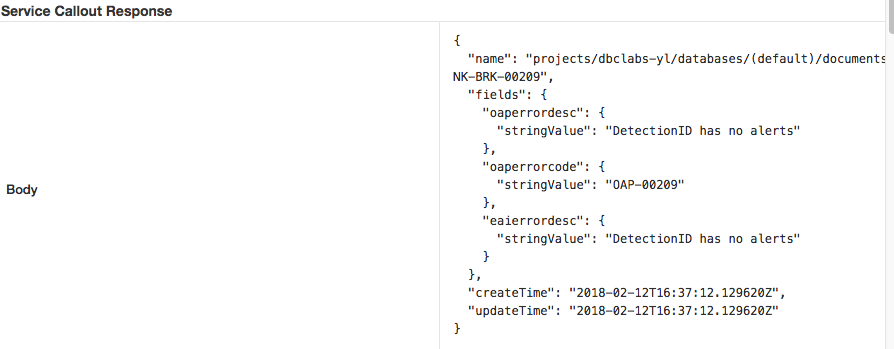
Extract Variables Policy to Extract Error Code Instance
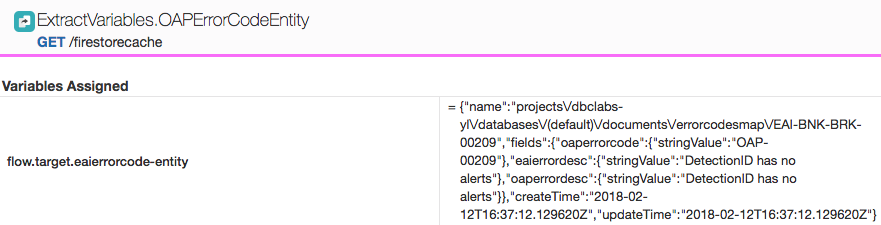
1. Add MEDIATION/Extract Variables policy with name ExtractVariables.OAPErrorCodeEntity and XML definition:
<ExtractVariables async="false" continueOnError="false" enabled="true" name="ExtractVariables.OAPErrorCodeEntity">
    <DisplayName>ExtractVariables.OAPErrorCodeEntity</DisplayName>
    Source>flow.firestore.response</Source>
    <JSONPayload>
        Variable name="flow.target.eaierrorcode-entity" type="string">
            JSONPath>$</JSONPath>
        </Variable>
    </JSONPayload>
</ExtractVariables>
Policy to Create Message Object Containing Error Code Mapping Instance
1. Add MEDIATION/Assign Message policy with names AssignMessage.JSONtoMessage and XML definition
<AssignMessage async="false" continueOnError="false" enabled="true" name="AssignMessage.JSONtoMessage">
    <DisplayName>AssignMessage.JSONtoMessage</DisplayName>
    <AssignTo createNew="true" type="request">flow.message.eaierrorcode-entity</AssignTo>
    <Set>
        <Payload contentType="application/json">
            {flow.target.eaierrorcode-entity}
        </Payload>
    </Set>
    <IgnoreUnresolvedVariables>true</IgnoreUnresolvedVariables>
</AssignMessage>
2. Add MEDIATION/Extract Variables policy with names ExtractVariables.GetOAPErrorCode and XML definition:
<?xml version="1.0" encoding="UTF-8" standalone="yes"?>
<ExtractVariables async="false" continueOnError="false" enabled="true" name="ExtractVariables.GetOAPErrorCode">
    <DisplayName>ExtractVariables.GetOAPErrorCode</DisplayName>
    <Source>flow.message.eaierrorcode-entity</Source>
    <JSONPayload>
        <Variable name="flow.target.oaperrorcode" type="string">
            <JSONPath>$.fields.oaperrorcode.stringValue</JSONPath>
        </Variable>
    </JSONPayload>
</ExtractVariables>
Save, Deploy and Test the Flow
1. Press the Save button. Save as a new revision.
2. Switch to TRACE tab. Press the Start Trace Session button.
3. Click the Send button to execute http://dbcedge-eval-test.apigee.net/firestorecache GET request.
Observe and Analyse
* The AssignMessage.SetEAIErrorCode policy initialises flow.target.eaierrocode variable

* ServiceCallout.GetFirestoreDocument response body contains Firestore document JSON datagram with selected instance of the collection.
* ExtractVariables.OAPErrorCodeEntity has flow.target.eaierrorcode-entity JSON object, extracted from the returned Firestore document.
* ExtractVariables.GetOAPErrorCode defines correct flow.target.oaperrorcode document fetched from the Firestore collection.

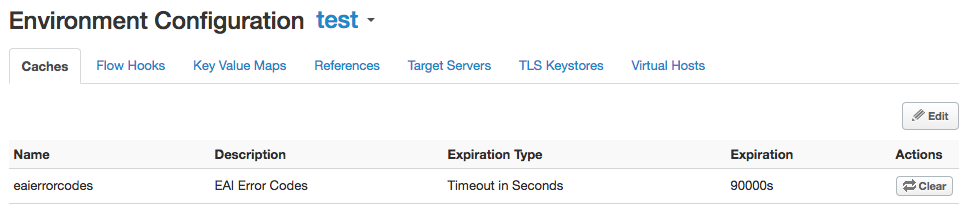
Define Cache eaierrorcodes
1. Switch to APIs/Environment Configuration
2. Select test environment. Make sure that Caches is an active tab.
3. Click on the Edit button. Click on + Cache button
4. Populate Cache properties:
Name: eaierrorcodes
Description: EAI Error Codes
Expiration Type: Timeout in Seconds
Expiration: 90000
Click Save
Define Cache Processing for Error Code Mappings
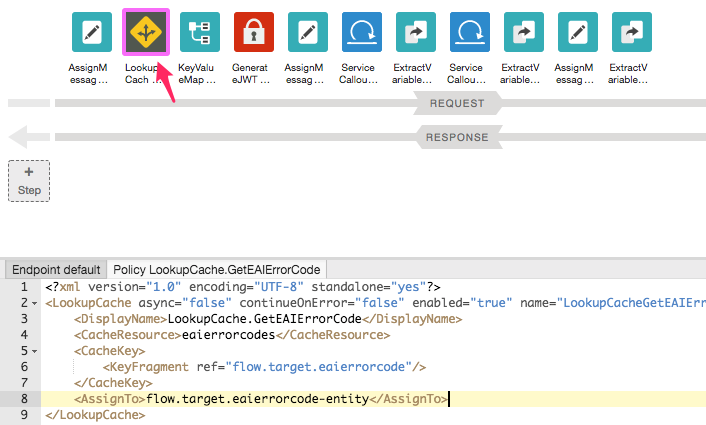
1. In the Edge UI DEVELOP tab of the firestorecache proxy Add TRAFFIC MANAGEMENT/Lookup Cache policy with names LookupCache.GetEAIErrorCode.
<?xml version="1.0" encoding="UTF-8" standalone="yes"?>
<LookupCache async="false" continueOnError="false" enabled="true" name="LookupCacheGetEAIErrorCode">
    <DisplayName>LookupCache.GetEAIErrorCode</DisplayName>
    <CacheResource>eaierrorcodes</CacheResource>
    <CacheKey>
        <KeyFragment ref="flow.target.eaierrorcode"/>
    </CacheKey>
    <AssignTo>flow.target.eaierrorcode-entity</AssignTo>
</LookupCache>
2. As it will be added at the end of the policy sequence, drag-and-drop the policy between AssignMessage.SetEAIErrorCode and KeyValueMapOperations.GetFirestorePrivateKey.
3. Add its counterpart, TRAFFIC MANAGEMENT/Populate Cache policy named PopulateCache.SetEAIErrorCode and XML definition:
<?xml version="1.0" encoding="UTF-8" standalone="yes"?>
<PopulateCache async="false" continueOnError="false" enabled="true" name="PopulateCache.SetEAIErrorCode">
    <Source>flow.target.eaierrorcode-entity</Source>
    <CacheKey>
        <KeyFragment ref="flow.target.eaierrorcode"/>
    </CacheKey>
    <CacheResource>eaierrorcodes</CacheResource>
    <ExpirySettings>
        <TimeoutInSec>36000</TimeoutInSec>
    </ExpirySettings>
</PopulateCache>
4. Drag-and-drop it between ExtractVariables.OAPErrorCodeEntity and AssignMessageJSONtoMessage policies.

5. Add branching logic for bypassing cache if the value is found in the cache.
In the Navigator click on Proxy Endpoints/default item. This action opens the Proxy Endpoint definition in the XML editor pane.
6. In the editor, for steps between KeyValueMapOperations.GetFirestorePrivateKey and PopulateCache.SetEAIErrorCode inclusive, add condition element
<Condition>lookupcache.LookupCacheGetEAIErrorCode.cachehit == false</Condition>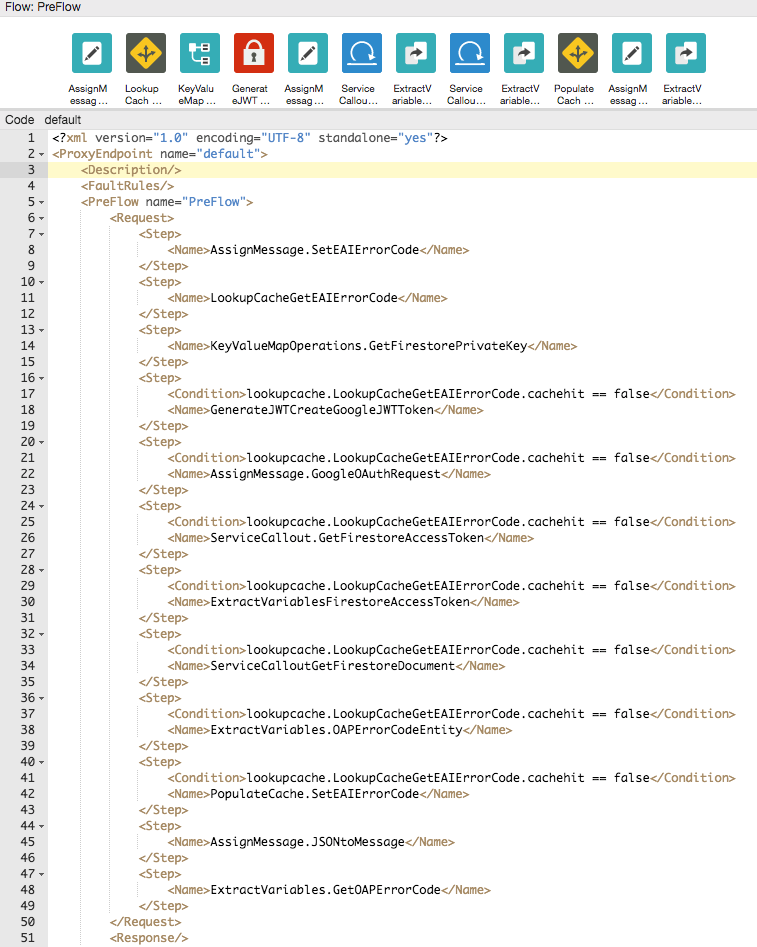
This corresponds to the following flow chart:
7. Save, Deploy.
1. In the TRACE tab with Start Trace Session switched on, execute the request by pressing the Start button.

Transaction Map would look like:

2. Press the Send button again. As this time the entity is read from the cache, the Transaction Map would like, indicating skipped steps:


3. Go to APIs/Environment Configuration, Select environment test and Cashes tab.
4. Invalidate cache eaierrorcodes by pressing its Clear button.
5. Execute the request to the proxy again. This time Transaction Map will show that all steps are executed, none are skipped.
